Thursday, December 31, 2009

Mike's Christmas Present (Rod Build #2)

I had talked with Michael several times during the summer about building a couple of 2wt fly rods.  I decided I'd better get busy and get one built for him as his Christmas present.  I finished the rod just before Christmas, but not in time for it to be under his and JaNae's tree.  At least he got it before New Year's.  Anyways, now that he's opened it, I can finally post pictures.  It was driving me crazy to be working on a rod building project and not be able to tell anyone about it! 

Here are the rod details:
--  6'6" 4 pc 2wt Tiger Eye (tiger eye brown color)
--  Struble dark nickel silver uplocking slide band reel seat with teak insert
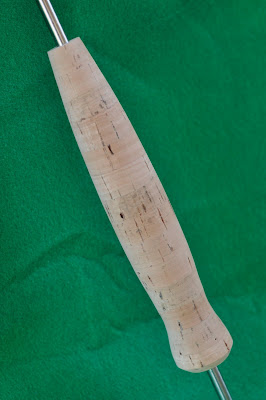
--  Custom grip made from Burnt, Laguna, and Copano exotic cork
--  Dark nickel silver winding check
--  Black nanolite ring lock stripping guide (one size 8)
--  Black H&H single foot fly guides (one size 2, seven size 1 guides) and tiptop
--  Gudebrod chestnut thread with Sulky dark copper and light copper trim
--  Pheasant and jungle cock feather inlay

Here's the finished rod.  Michael should be able to find some fish to put a pretty serious bend in this rod up on the Logan and Blacksmith Fork.  It should be a lot of fun.


Here's a picture showing the reel seat.  I absolutely love the dark nickel finish -- still shiny but not bright.


I tried to keep the rod kind of stealthy; black guides and brown wraps to match the color of the rod.  The only real flashy trim is on the ferrules and butt section right in front of the grip.  Here's a shot of the ferrule wraps.  You can see how the chestnut brown thread wraps blend in nicely with the rod blank.  Only the trim flash on the ferrules lets you know where the rod comes apart.


Here's the feather inlay I put on the rod.  It's just in front of the grip and winding check.  The base feather is from a pheasant.  The top feather is a jungle cock nail.  I really like the way this turned out.  It's just enough to set the rod apart -- definitely a custom rod.


This was the first rod I've tried to write on.  Yeah, it's tougher than you might think, at least it was for me.  I wrote the rod details on one side and Michael's name on the other. 


One last picture of the rod ...


I included a custom rod tube with a built-in pocket liner as part of the gift.  Afterall, every new rod needs a new case, right?  And how else was I to mail the rod without risking breaking it into a million pieces?  Each rod section has its own pocket/sleeve inside the rod tube to keep it protected. 

I also sent a 2wt DT fly line so Michael would have a new line to try out his rod.  Now all he needs is some reasonably good weather before he can try his new rod.  Of course, a reel or spool to put the 2wt line on would help, too ...

Hope you like it Michael ... and tight lines ...

Fall Fishing

My friend John and I managed to get out fishing for an afternoon back in November.  While the fishing wasn't the greatest, we still had a good time.  If nothing else, it was really, really nice to get out of town and get up into the mountains for a while.  Whether or not I'm catching fish, the scenery sure is nice.  Here's what the stream looked like as we hiked down from the car.


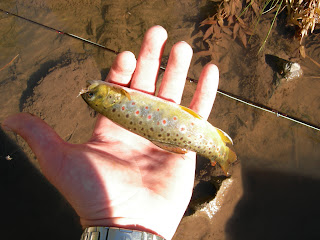
Here's my one catch for the day - a very respectable brown trout.  He gave me a good little fight as I played him in to hand.


We came up on a nice little waterfall on the stream. 


Maybe I'll get out sometime during the winter and see what I can catch.  I'm not sure I can make it until springtime without some fishing time ...

(Thanks for taking the pictures John.  I still need to get a new camera to take with me ...)

Saturday, August 8, 2009

More Blacksmith Fork Pictures

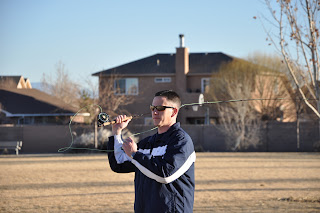
Mike just sent me copies of his pictures from our fishing trip up to the Blacksmith Fork. Hope you like them as much as I do. Here's one of me doing my best to make a decent cast.


Mike's enjoying a nice sized brown ...


We really did have a good time!

Saturday, July 11, 2009

Flying on the Blacksmith Fork

The main reason I was frantically working to get my new rod finished up was so that I could take it out fishing while we were up in Utah for the 4th of July. In addition to all the Independence Day celebrations, Mike and I had planned to meet up and go fishing on Monday, mostly on the Blacksmith Fork Creek.

Mike and JaNae were kind enough to let me stay at their apartment Sunday evening, even serving up a nice chicken fajita for dinner. We got to bed a bit late after staying up talking fly fishing. Morning came nice and early, but the fishing would have to wait. Mike had to take a flight student up for a flight first thing Monday morning, so he took me along for the ride. It was a lot of fun. It's too bad Mike lives so far away, I'd be tempted to hire him to teach me to fly.
(just what I'd need, another expensive hobby ...)


Once the flying was done, it was time to head out and start fishing. We started out up higher in the canyon fishing Rock Creek. Rock Creek is a very small stream. We saw a few nice fish, and had a few bites/refusals, but were unable to land any fish up there. After lunch (I really do miss the Old Grist Mill ... fantastic breads and sandwiches), we fished a stretch of the Blacksmith Fork that Mike likes. We started out at an awesome pool and that's where my new rod took it's first fish - a nice, small brown trout.


After Mike caught a fish of his own from the pool, we started fishing upstream and had an awesome time. Of course, Mike showed off his crazy fishing skills while I played the part of a novice fly fisherman (for which I am definitely qualified). Even though it seemed like my flies spent as much time in the trees and bushes as the water, I still had a great time. Both Mike and I ended up catching 5 fish each that afternoon.


I didn't realize until seeing this picture that I'd spent at least part of the afternoon fishing with my hat on backwards. Maybe that's why I kept losing my nymphs ...
After fishing our stretch of the Blacksmith, we headed back up to Rock Creek at sunset to see if we could do better the second time around. Uh, no. We did however take some serious abuse from the meanest, most persistent mosquitos I've ever experienced (my arms still look like I have some sort of disease - measles, chicken pox ...). We returned to the Blacksmith and fished until dark. Monday was, by far, the most I'd fished in a single day. Next time we get together Mike, I'll have to take more pictures.

All in all, a great day. Sure it came with some casualties - Mike lost his sunglasses and fishing net - but I know I had a great time fly fishing with my brother. Hopefully Mike agrees. Thanks again, Mike!

Friday, July 3, 2009

Five Rivers Signature V 8'6" 3wt

Here is the proof that my first custom, handmade fly rod is complete. Yeah, it took me a while to get this one done, but it was so worth it. I took it out and cast it on the Provo River yesterday. I absolutely love it. I would have said that I fished it on the Provo, but I still don't have my first fish on this rod yet. Hopefully I can take care of that soon.

Here are the rod details:
Dan Craft Five Rivers Signature V 8'6" 3wt 4pc blank
REC NSUSL nickel silver reel seat with amboyna burl insert
Custom shaped (modified reverse half wells) cork grip
Forecast light titanium colored winding check.
Gudebrod garnet thread with Sulky dark copper trim wraps (no color preserver)
Fuji TLNSG titanium stripping guide (size 10)
Black nickel snake guides (one size 2 guide, then eight size 1/0) and tiptop


This picture shows a few of my wraps with the garnet and metallic copper thread. Because I didn't use any color preserver on the thread, the nylon darkens and almost goes kind of transparent when the thread finish epoxy is applied. This was the effect (and color) as I looking for. The garnet thread looks very dark, almost black, in the shade. However, you can see the deep red color in the sunlight. I felt that the copper trim wraps added a lot of color to the rod and complemented the amboyna burl reel seat insert.


There is a small wrap of garnet thread directly in front of the winding check, just to offset the check a bit more. The hook keeper is wrapped completely from front to back. I used different sized copper trim bands depending on the size of the guides. The stripping guide has a 5-turn trim band at the end of each foot. The first snake guide (size 2) has 3-turn trim bands. All the other snake guides have a single turn trim band.


This next picture shows the ferule wraps at the joint of each section of the rod. It also shows a bit of the deep red color of the garnet thread. On the two smallest sections, the ferule wrap is integrated into the guide foot wrap. Having the guide foot wrapped in with the ferule wrap saves thread and finish epoxy weight. You can also see in this picture how the guide feet show through the semi-transparent thread wraps.


Right now, I'm using my new Galvan Open Back fly reel for this rod. After all, a new rod deserves a new reel, right? This OB-4 reel is rated for a 5 or 6 weight rod, but only weighs 4.6 oz or so. Even with my 3wt fly line and some backing on, it balances the fly rod fairly well. The balance point is about 1/3 the way back from the front of the grip. I didn't have any trouble fishing (casting) it out on the river yesterday.


Anyways, hope you like my new fly rod as much as I do. I've already got my next rod build project planned out, and I can't wait to get started.

(Heidi -- Thanks for helping take the pictures and for being so supportive of me building this rod, especially over the past week.)

Monday, June 29, 2009

Really Almost Done ...

Just finished putting on the 2nd coat of Threadmaster Lite -- the thread finish epoxy I'm using. Of course, I still have a lot of turning to do ...

This round was a bit more challenging for me. I had to get a small bead of the finish off the threads and onto the blank. This makes a nice seam and transition. Of course, it's easier said than done, especially for my first attempt. Still, I feel it came out well and I'm quite proud of the way it's turned out.

So I guess this means that the end is really, really near. The rod should be complete by tomorrow morning. I'll let it sit for a couple of days to let the finish really harden up. But still, unless something goes terribly wrong tonight, this should be it -- my first rod will be ready to fish this weekend!

Sunday, June 28, 2009

Almost Done

Well, no pictures here so you'll just have to take my word for it, but my first fly rod is almost done. It's been a busy week for putting the rod together. The handle and reel seat have been epoxied in place for a couple of weeks now, so I 've spent a few hours just about every night this week wrapping the guides on. Wrap a guide on, realize there was something about it I didn't like, then cut it back off, repeat. I ended up taking Friday off from work to try to make some good, solid progress on it. I started wrapping guides on the blank at about 1pm. I finally had it all finished at 2pm Saturday afternoon. Yeah, I pulled an all-nighter wrapping the guides on. While the wrappings are not necessarily perfect, they're about as good as I was going to get (especially being so tired that I couldn't keep my hands from shaking).

Well, today was the day to start putting on the thread finish. This is the last step to finishing the rod. I was pretty nervous about it, but hey, when you've read as much on the internet as I have, you feel like you can do just about anything. Of course, that's no guarantee that it'll work out. I shut myself up in the "fish bathroom" (first my aquarium supplies, now my fly rod, building ... what's next for the fish bathroom?) and started mixing the finishing epoxy. That was about 5pm tonight. I've spent the last 5 hours or so turning the rod sections every 5 to 10 minutes so the finish will level out smooth.

So far, it's looking pretty good. I'm happy with how it's turning out and can't wait to post some pictures. I've got to do at least one more coat of finish epoxy before I'll call it complete. I'll get that going tomorrow night.

This rod building has been a lot of fun. Can't wait to get started on the next rod(s).

Well, that's my timer going off -- better go turn the rod, again ...

Saturday, May 23, 2009

2nd Grip

I made my second fly rod grip tonight. I followed the same basic pattern as my first grip - a modified RHW grip. However, I left the front end of this grip a little larger in diameter than before. I also moved the "saddle" a little more aft. These were mostly just experiments - trying to get a better feel for what I like in a grip. I think this one came out fairly well. I used 400 grit sandpaper at the end for a nice soft feel.

This grip has some burl cork in it. I like the color the burl cork adds to the grip as well as the patterning it brings. I'll definitely use burl cork again in future grips.

I made my first grip last week while sitting at the kitchen table. You may notice from these pictures that I moved outside to sand this this grip down. For some reason I just didn't feel like having to clean up all the cork dust from the kitchen again.


Sunday, May 17, 2009

First Grip

I finally managed to sand down my first grip. It came out okay, especially for my first attempt. I used the set of cork rings that I glued up about a month ago (see "Trying to get a grip ..." for a picture of the rings before sanding). This cork was the worst of my cork rings, but I think the grip still came out okay. Even though there are a lot of flaws in the cork, most of them are quite shallow. They just give the grip some character ...

The pictures don't really show all the details, but I made a little "lathe" for sanding down my cork handles. One one side, I have a raised platform to which I clamp a hand drill. On the other side, I have a vertical board to support the other end of the turning mandrel - a 1/4" stainless steel rod a picked up at the hardware store. I drilled a hole in the vertical board and put a skateboard bearing in there. A little bit of blue tape helps the bearing fit tightly in the hole. I also put some tape on the steel rod to make it fit the inner hole of the bearing, too.

Once everything was in place, I turned on the drill and started removing cork. I found that a flat file worked well for rough shaping. I also used some drywall sandpaper (a 220 grit mesh) that took the cork off quickly. Once I had the shape about right I used some 220 and 320 grit regular sandpaper to smooth it all out.

I tried to follow a pattern for a modified reverse half wells. I wasn't sure how I'd like the small diameter front of the grip as I've only fished with a Fenwick style grip, but so far I really like the way this one feels. This grip came out a bit smaller diameter than I was hoping for, but that's only because I got a bit carried away with the file. Still, it fits my hand nicely and I really like the swell at the rear of the grip.

Let me know what you think of my first grip ...


Wednesday, April 15, 2009

Trying to get a grip ...

Well, I'm starting to work on getting the grip made for my new rod. I had bought enough cork rings to make three grips. I figured I'd better plan on ruining the first couple of tries before hopefully making something useful by the third attempt. Anyways, I sorted out my rings into three groups: Best, Good, & Practice. I planned out my layup and prepared to glue the rings together - the Practice rings of course. No need to waste my good cork right now ...

The cork rings are 1-1/4" diameter and about 1/2" thick. Each ring came pre-drilled with a 1/4" bore hole through the middle. Most standard fly rod grips are about 7" long, so I planned on gluing up 14 rings. I bought a 12" length of 1/4" diameter threaded rod to use as a mandrel. A couple of nuts and a 1-1/4" washer on each end clamp the cork together on the threaded rod while the glue is drying. I put an extra cork ring on each end when planning this out. I had read about having an extra ring (with no glue of course) on the ends to help even out the clamping pressure. In the end, I didn't use the extras at the end, but still, here's what it looked like:


Not all of the rings mated up against eachother cleanly. It was clear that on a few of the rings the faces weren't cut truly even and parallel. I could see little gaps between some of the rings when dry fitting them on the mandrel. So I took a little sandpaper to each ring face to even them up and prep the cork for gluing. Worked great.

I used Titebond III wood glue to glue the rings together. I wrapped the threaded rod with Teflon tape to keep the glue from bonding to the rod. The last thing I needed was to glue my rings to each other and the mandrel. I slid the first ring onto the rod and up against the base washer. I coated the exposed face of the cork with glue. The next ring went onto the mandrel. I put glue on both sides and slid it up against the previous ring. This is all there was to it, just repeating this until the last ring. Of course, I only put glue on "inside" of the last ring.

I put on the second washer and nuts and then began to clamp the rings together. Of course, the glue shot out from between the rings and went all over the place. I had glue dripping all over the place. My hands were just about coated. It was on the kitchen counter. It was on the floor. It was a good thing Heidi was taking a nap. It was even better that I got it all cleaned up before she came out. I would have been in serious trouble - more trouble than I'm going to be when she reads this. Fortunately Titebond cleans up with a few wet paper towels.

With the cork rings glued and clamped up, I let them sit overnight. In the morning, I just slide the glued-up cork off the mandrel. Using the Teflon worked great - nothing sticks to Teflon, right?

Here are the rings all glued up. I realized after taking them off the mandrel that the grip was a bit shorter than before. In sanding the faces of the cork, I'd shortened the grip by 1/4". I only had to take off 0.009" per ring face to lose 1/4" on the grip length. Oh well, I think that a 6-3/4" grip will work out just fine for this first attempt.


Now I have to finish putting together my little lathe, otherwise known as my hand-held drill, and I'll be ready to sand this one down to size/form. Hopefully I'll get to that this weekend.

Saturday, March 21, 2009

Sneak Peak: Building My Own Fly Rod

One of my goals this year is to build my own fly rod. I decided that I wanted a lighter weight rod - you know, something that will make those little trout I like to catch feel like monsters at the end of the line. So I decided that I needed to build a 3wt - light enough to delicately land a small dry fly, but with enough to it that it could handle a small beadhead nymph when needed.

I've spent a lot of time trying to decide on just what I wanted in my first custom fly rod. I knew I wanted a 3wt, but what length, color, number of rod sections, etc? What kind of guides? What type of reel seat? Well, decisions were finally made about two weeks ago. I ordered my rod components and they've arrived over the past couple of days (at least the stuff that I've ordered has come - I still have a few odds and ends I need ...). Here's a sneak peak at it:


The rod blank is a 4pc, Dan Craft Five Rivers Signature V 8'6" 3wt. It's a nice glossy, dark carbon/graphite grey and is a very lightweight rod blank. By all accounts, it should make a fine rod. I thought about going with single foot guides, but in the end decided on "black nickel" snakebrand snake guides. You can see one of these double foot guides and the matching tip top. I really like the black nickel finish on these guides. I think the dark, shiney grey matches the blank well. They end up being a lot more subtle ("stealthy" as I like to think) than regular chrome guides would be. Also shown is my titantium stripping guide. Once again, I was trying to match the "stealthy" colors of the other guides while going lightweight. Besides, titanium is just cool.


My reel seat is nickel silver with an amboyna burl insert. As seen in the first picture, the reel seat is mortised; the reel will sit in the grove along the bottom of the reel seat. I guess I'm going to need a new reel to go with my new rod ...

I also ordered some cork rings to make my own grip. Normally I wouldn't have thought about jumping into doing so - not sure I'm ready for this much of a challenge on my first rod build - but I got in on a group buy and bought this cork direct from Portugal for a great price. Let's just hope my untested cork skills are up to the challenge. Truth is I bought extra because I'm sure I'll need the practice ...


Well, that's about it for now. I'm really excited about this. In fact, I've been practically obsessed with this for the past couple months. I'll post updates as I work on putting it all together. Of course, it's become obvious that I'll have all the help I could ask for. Hopefully too much help doesn't become a bad thing.
- "Stay away from that rod!"
- "Can I please have my cork back?"
- "Take that piece of metal (the snake guide) out of your mouth right now!"


And that was just while taking pictures tonight ...

Tuesday, February 10, 2009

Memories of October

I've got to get out fishing ... and soon ...

My last trip fishing was back in October. I managed to sneak away from work for a day and went fishing in the Jemez with my friend John. The two of us left home well before dawn on a nice Tuesday morning. Why Tuesday? Because John had the day off from work and besides, how many fishermen are going to be out on the stream on a Tuesday in late October? I mean besides the two of us!

Anyways, here's a few pictures that reminded me of the good time we had that day. We only caught 4 fish between the two of us, but had a lot of fun on the river. The first brown I caught decided that my personal variant of the Elk Hair Caddis would be worth the take. I tie this EHC with some golden pheasant tippet (dyed the feathers bright orange using Kool-Aid!) for a tail, a peacock body, elk hair for the wing, and flame orange thread. You can see the fly still hooked on its upper lip. This is the first (and so far only) fish I've taken on a dry fly. It was so much fun to see the fish rise and take the dry fly! I'm looking forward to more dry fly fishing this year.


I saw this little fish cruising in a shallow pool off to the side of the main river flow. I cast a few times towards the head of the pool where there was a little stream of water entering and let my nymph float along in what little current there was until it had passed my target. On the third cast, my soft hackle hare's ear did the trick and "Fish on!" Sure, someone's probably looking at this fish thinking, "But it's so little!" Maybe so, but I still caught it and had a lot of fun doing so. And besides, maybe I'll catch this same fish again this year, only this time it'll be a bit bigger.


Here's John with a nice brown trout. John found a great spot on the river where he was able to pull out this brown and a rainbow. As I recall, this brown trout put a little bit of a bend in John's fly rod as he brought the fish to hand. Good fun and a good looking fish!


Looking back at these pictures has really made me want to get out and catch of few of those beautiful brown trout. I really want to find a place here in NM to catch some brook trout - those are some good looking fish! I'll have to do some NM fishing research to see if I can find some brookies here in the state.

Also, I've realized that I need to get a new pocket-sized digital camera. Our old camera was "destroyed" over Christmas. I need a way to take pictures of my fishing adventures, right?

Sunday, February 1, 2009

Casting Practice

Even though it was a bit chilly on Saturday, I wanted to get out and practice casting. So of course I generously suggested that we all go as a family over the park. I think the last time I had my rod out was back in October. It felt nice to get out, string up some line, and throw a few tailing loops. Yeah, I know ... not good, and I've got a several new wind knots to get out of my practice leader, too. But that's why they call it practice ...


Heidi really liked this picture. It captured the flip in the loose fly line I'm holding in my hand. Pretty cool! (click on the picture to get a better look) Of course, it also shows what a horrible cast it was - I was dropping the rod tip seriously far down on my backcasts. Still, a nice picture nonetheless ... and a reason to practice more ...


I had placed my hat out on the grass as a target. I would cast as best I could from 30' out and try to land the tip of my fly line on top of my hat. It was good target practice. Hopefully I'll get pretty good at this in due time.

For a while my hat was replaced with a moving target. Heidi said, "The fish don't hold still." Well, neither does Sydney, at least not for long.


Of course, this time at the park gave Syd and I a chance to practice casting together. I hope she had a good time casting the fly rod for a few minutes. I'm looking forward to when we'll be able to go out and catch some fish on a fly together ...

Monday, January 19, 2009

Stimulator Pattern

Here are a few pictures of a stimulator pattern that I tied up over the holidays. I first learned to tie this fly last summer, but I will be the first to admit that I still need a lot of practice on this pattern. I won't tell you how long it took me to get this one to look respectable ...


I've included a couple of features in this variation on the stimulator that I quite like. Before I put the wing on the fly, I like to tie in a few strands of flash. I like the way they add a little bit of sparkle to the fly; perhaps a bit of motion too as the fly drifts along. I also add a shield of calf hair in front of the wing. This adds a bit more white to the fly and makes it a bit easier to see on the water.

Hope you like my version of the stimulator. Here's the pattern that I used to tie this fly:

Hook: Daiichi 1270 (or TMC 200R)
Thread: 6/0 Rusty Dun UNI-Thread
Tail: Elk Hair
Body: Rusty Brown Ice Dub
Ribbing: Extra Fine Copper Wire
Body Hackle: Grizzly Hackle
Flash: Pearl Krystal Flash
Main Wing: Elk Hair
Over Wing: White Calf Hair
Thorax: Peacock Black Ice Dub
Thorax Hackle: Grizzly Hackle

I've tied variants of this stimulator pattern with a variety of colors - just have to use one's imagination. I'm sure you'll see some more stimulators posted in the future. They're a fun fly to tie.