Saturday, March 21, 2009

Sneak Peak: Building My Own Fly Rod

One of my goals this year is to build my own fly rod. I decided that I wanted a lighter weight rod - you know, something that will make those little trout I like to catch feel like monsters at the end of the line. So I decided that I needed to build a 3wt - light enough to delicately land a small dry fly, but with enough to it that it could handle a small beadhead nymph when needed.

I've spent a lot of time trying to decide on just what I wanted in my first custom fly rod. I knew I wanted a 3wt, but what length, color, number of rod sections, etc? What kind of guides? What type of reel seat? Well, decisions were finally made about two weeks ago. I ordered my rod components and they've arrived over the past couple of days (at least the stuff that I've ordered has come - I still have a few odds and ends I need ...). Here's a sneak peak at it:


The rod blank is a 4pc, Dan Craft Five Rivers Signature V 8'6" 3wt. It's a nice glossy, dark carbon/graphite grey and is a very lightweight rod blank. By all accounts, it should make a fine rod. I thought about going with single foot guides, but in the end decided on "black nickel" snakebrand snake guides. You can see one of these double foot guides and the matching tip top. I really like the black nickel finish on these guides. I think the dark, shiney grey matches the blank well. They end up being a lot more subtle ("stealthy" as I like to think) than regular chrome guides would be. Also shown is my titantium stripping guide. Once again, I was trying to match the "stealthy" colors of the other guides while going lightweight. Besides, titanium is just cool.


My reel seat is nickel silver with an amboyna burl insert. As seen in the first picture, the reel seat is mortised; the reel will sit in the grove along the bottom of the reel seat. I guess I'm going to need a new reel to go with my new rod ...

I also ordered some cork rings to make my own grip. Normally I wouldn't have thought about jumping into doing so - not sure I'm ready for this much of a challenge on my first rod build - but I got in on a group buy and bought this cork direct from Portugal for a great price. Let's just hope my untested cork skills are up to the challenge. Truth is I bought extra because I'm sure I'll need the practice ...


Well, that's about it for now. I'm really excited about this. In fact, I've been practically obsessed with this for the past couple months. I'll post updates as I work on putting it all together. Of course, it's become obvious that I'll have all the help I could ask for. Hopefully too much help doesn't become a bad thing.
- "Stay away from that rod!"
- "Can I please have my cork back?"
- "Take that piece of metal (the snake guide) out of your mouth right now!"


And that was just while taking pictures tonight ...

Tuesday, February 10, 2009

Memories of October

I've got to get out fishing ... and soon ...

My last trip fishing was back in October. I managed to sneak away from work for a day and went fishing in the Jemez with my friend John. The two of us left home well before dawn on a nice Tuesday morning. Why Tuesday? Because John had the day off from work and besides, how many fishermen are going to be out on the stream on a Tuesday in late October? I mean besides the two of us!

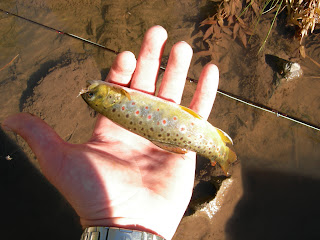
Anyways, here's a few pictures that reminded me of the good time we had that day. We only caught 4 fish between the two of us, but had a lot of fun on the river. The first brown I caught decided that my personal variant of the Elk Hair Caddis would be worth the take. I tie this EHC with some golden pheasant tippet (dyed the feathers bright orange using Kool-Aid!) for a tail, a peacock body, elk hair for the wing, and flame orange thread. You can see the fly still hooked on its upper lip. This is the first (and so far only) fish I've taken on a dry fly. It was so much fun to see the fish rise and take the dry fly! I'm looking forward to more dry fly fishing this year.


I saw this little fish cruising in a shallow pool off to the side of the main river flow. I cast a few times towards the head of the pool where there was a little stream of water entering and let my nymph float along in what little current there was until it had passed my target. On the third cast, my soft hackle hare's ear did the trick and "Fish on!" Sure, someone's probably looking at this fish thinking, "But it's so little!" Maybe so, but I still caught it and had a lot of fun doing so. And besides, maybe I'll catch this same fish again this year, only this time it'll be a bit bigger.


Here's John with a nice brown trout. John found a great spot on the river where he was able to pull out this brown and a rainbow. As I recall, this brown trout put a little bit of a bend in John's fly rod as he brought the fish to hand. Good fun and a good looking fish!


Looking back at these pictures has really made me want to get out and catch of few of those beautiful brown trout. I really want to find a place here in NM to catch some brook trout - those are some good looking fish! I'll have to do some NM fishing research to see if I can find some brookies here in the state.

Also, I've realized that I need to get a new pocket-sized digital camera. Our old camera was "destroyed" over Christmas. I need a way to take pictures of my fishing adventures, right?

Sunday, February 1, 2009

Casting Practice

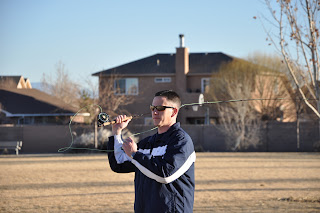
Even though it was a bit chilly on Saturday, I wanted to get out and practice casting. So of course I generously suggested that we all go as a family over the park. I think the last time I had my rod out was back in October. It felt nice to get out, string up some line, and throw a few tailing loops. Yeah, I know ... not good, and I've got a several new wind knots to get out of my practice leader, too. But that's why they call it practice ...


Heidi really liked this picture. It captured the flip in the loose fly line I'm holding in my hand. Pretty cool! (click on the picture to get a better look) Of course, it also shows what a horrible cast it was - I was dropping the rod tip seriously far down on my backcasts. Still, a nice picture nonetheless ... and a reason to practice more ...


I had placed my hat out on the grass as a target. I would cast as best I could from 30' out and try to land the tip of my fly line on top of my hat. It was good target practice. Hopefully I'll get pretty good at this in due time.

For a while my hat was replaced with a moving target. Heidi said, "The fish don't hold still." Well, neither does Sydney, at least not for long.


Of course, this time at the park gave Syd and I a chance to practice casting together. I hope she had a good time casting the fly rod for a few minutes. I'm looking forward to when we'll be able to go out and catch some fish on a fly together ...

Monday, January 19, 2009

Stimulator Pattern

Here are a few pictures of a stimulator pattern that I tied up over the holidays. I first learned to tie this fly last summer, but I will be the first to admit that I still need a lot of practice on this pattern. I won't tell you how long it took me to get this one to look respectable ...


I've included a couple of features in this variation on the stimulator that I quite like. Before I put the wing on the fly, I like to tie in a few strands of flash. I like the way they add a little bit of sparkle to the fly; perhaps a bit of motion too as the fly drifts along. I also add a shield of calf hair in front of the wing. This adds a bit more white to the fly and makes it a bit easier to see on the water.

Hope you like my version of the stimulator. Here's the pattern that I used to tie this fly:

Hook: Daiichi 1270 (or TMC 200R)
Thread: 6/0 Rusty Dun UNI-Thread
Tail: Elk Hair
Body: Rusty Brown Ice Dub
Ribbing: Extra Fine Copper Wire
Body Hackle: Grizzly Hackle
Flash: Pearl Krystal Flash
Main Wing: Elk Hair
Over Wing: White Calf Hair
Thorax: Peacock Black Ice Dub
Thorax Hackle: Grizzly Hackle

I've tied variants of this stimulator pattern with a variety of colors - just have to use one's imagination. I'm sure you'll see some more stimulators posted in the future. They're a fun fly to tie.

Friday, January 16, 2009

A New Vise for 2009

I now have a new vise for 2009. Some have suggested that it's not a "vise" but rather a "vice". I say perhaps both are true.

I had been looking to get myself a new fly tying vise for Christmas, but just never quite got around to it. If you know me well at all, you'll know that I usually have to research, wait, research some more, wait again, and then finally make a big purchase. My search for a new vise fit this description completely. So even though I had found a good deal on a vise that I liked, I just couldn't quite make the buy. Oh well ...

However, when we were up in Utah visiting family last Christmas/New Years, I made a trip in to Cabelas. I was just going to look. Yeah, right! I found a great deal on an HMH Standard Vise, the more expensive brother to the vise I was orginally looking at. This vise normally sells for $240 to $280. Cabelas had one on sale for $99.88. I didn't let it sit on the shelf. I bought it and ran.


I've tied a couple of flies on it so far and I absolutely love it. It has a nice, solid pedestal base (no more having to clamp the vise to the table). The jaws are solid and easily hold the hook. Perhaps nicest of all is the rotary feature. I can turn the cam lever at the back of the vise and rotate the fly around. This is great for looking at the fly from all sides and makes it easy to wrap hackle on the fly. This is one awesome tool.

Well, now that I've got a new vise, I don't have too many excuses to keep me from tying up a lot of flies this year. I've set a fly tying goal for the new year, but more about that in a future post.